Drawing down against a Forward
When a Forward becomes available, you can draw down against the available balance to make payments to beneficiaries or to send funds to your Multi-Currency Account.
Note: You must have a current (not expired) GMEI number to book forwards and forward drawdowns. If you do not have a GMEI number or it has expired, you will see a warning message at the top of , and you will not be able to book forwards. If that is the case, contact your representative.
You can draw down from more than one forward at a time as long as they are in the same currency. By drawing down from multiple forwards, you have access to more funds than are available in a single forward. You select all of the forwards you want to use first and then you create the drawdown.
There are two ways to drawdown against the forwards in Corpay Cross-Border:
-
You can individually select the forwards from the dashboard. For more information, see Selecting the forwards.
-
You can also mass drawdown from one or more available forwards using file upload. For more information, see Drawdown using File Upload.
Selecting the forwards
There are two ways to select the forwards you want to draw down - from the grid at the bottom of , and from the page.
- On , scroll down to the grid at the bottom of the page, and click to view all the booked forwards.
- Optionally, filter the list by choosing the currency you want to use from the dropdown list. If you want to select more than one forward, they must all be in the same currency.
You can filter the Forwards grid on Your Dashboard according to status. To view only the forwards that you can draw against, choose from the dropdown.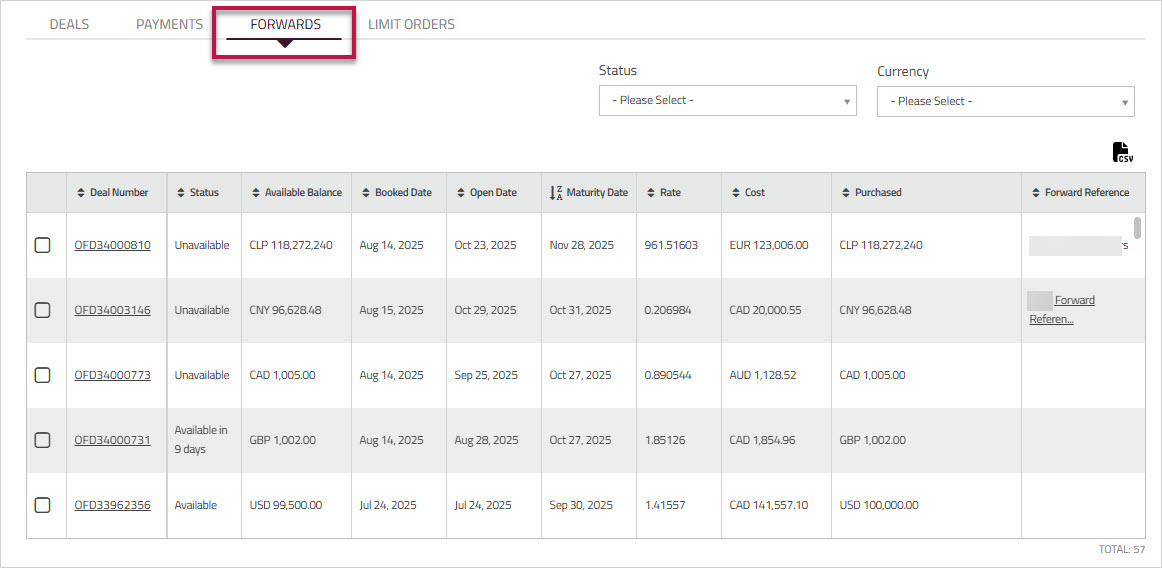
- From the list, click to put a check beside each of the forwards you want to draw against. All the forwards you choose must be in the same currency, and you can only select forwards that have the status .
-
Click the icon above the grid to export the data. The file name includes the date and time it was generated, for example, 2025-07-16-Forwards. The icon will be disabled if there is no data in the table.
-
Under , click .
The page displays a grid that shows only . - Optionally, filter the list by choosing the currency you want to use from the dropdown list. If you want to select more than one forward, they must all be in the same currency.
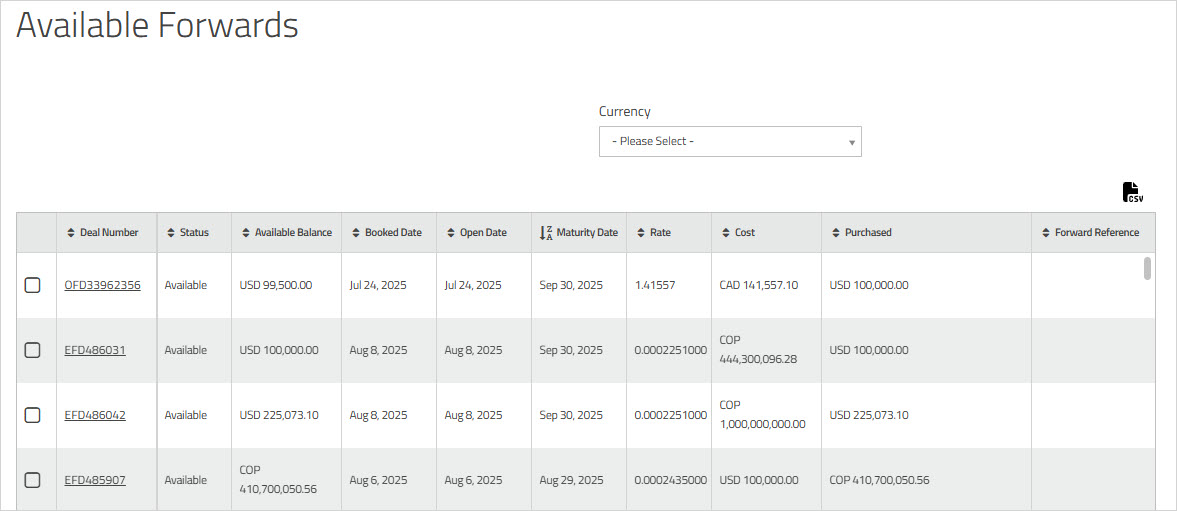
- From the list, click to put a check beside each of the forwards you want to draw down.
- Click the icon above the grid to export the data. The file name includes the date and time it was generated, for example, 2025-07-16-Forwards. The icon will be disabled if there is no data in the table.
Creating the Forward Drawdown
- After you select the forwards you want to draw down, scroll to the bottom of the grid, and click .
The page appears.
On the right side of the page, you can see the total available balance and the numbers of the deals that you are drawing against.
- Specify where you want to send the payment.
To send the payment to a beneficiary, in the field, you can start typing a sequence of characters that are in the beneficiary's name.
As soon as you enter at least three characters, the system starts searching for matches. All beneficiaries whose details match the search criteria you entered are displayed in a dropdown list. The more characters you enter, the more refined the search results.
Note: The characters you use to search are not context sensitive, and can include spaces. How to send the payment to your
 If you are enabled to use Multi-Currency Account, follow these steps to send the payment to your Multi-Currency Account instead of to a beneficiary.
- Click the toggle, which is located above the field.
The field name changes to .
- From the dropdown list, choose the Multi-Currency Account to which you want to send the payment.
Note: When you are sending the payment to a Multi-Currency Account, you do not need to complete the or fields.
After you select the Multi-Currency Account, you can hover your mouse over the label (just below the field) to view summary information.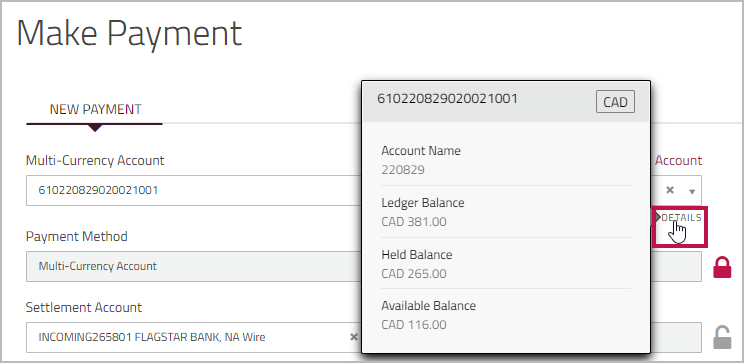
Multi-Currency Account details include: - —The amount that was in the Multi-Currency Account at the end of the previous business day.
- —The amount in the Multi-Currency Account that is allocated to cover payments that have been scheduled but are still incomplete or outstanding.
- —Ledger value minus Balance Held value. This is the amount that is available to use.
- Click the toggle, which is located above the field.
- Complete any of the fields that are not automatically filled in.
Mandatory fields are indicated by an asterisk (*).
Note: By default, the field displays the total amount that is available; however, you can change the amount if you want to send payments to more than one beneficiary. As you add additional payments, the value in the field is updated with the remaining balance. - If the payment is being sent on behalf of another person, enter the person's name in the field. In the field, start typing a sequence of characters that are in the remitter's name.
As soon as you enter at least three characters, the system starts searching for matches. All remitters with details that match the search criteria you entered are displayed in a dropdown list, and the matching portion is underlined. The more characters you enter, the more refined the search results. - Optionally, attach any related documents to the payment. For more information, see Attaching documents to payments.htm.
- Click .
- Optionally, repeat steps 5 to 8 to create another payment against the remaining balance (if applicable).
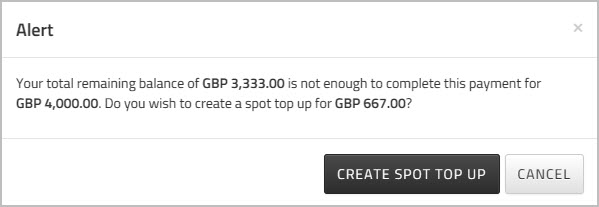
- If you enter a drawdown amount that is greater than the available balance in the selected Forwards, you will see a message that tells you that the Forward balance is less than the amount of the payment. Click to add the additional funds, or click and then edit the payment amount so that it does not exceed the available balance.
- Proceed to the section Completing a Forward Drawdown.
Drawdown using File Upload
Instead of selecting each forward contract individually from the dashboard, you can batch drawdown from multiple forward contracts using a single template file. To upload a drawdown import file,
-
In the toolbar, click Upload. The Upload Center opens.
-
From the Template dropdown list, choose Corpay Drawdown Import (CSV).
The drawdown import file must contain valid information to batch drawdown from the available forwards contracts as well as information to create or update beneficiaries and remitters who will receive those payments. You can drawdown from available Open Forwards and Closed Forwards at maturity. -
Locate the file you want to upload, and then drag the file into the file drop area. For more information, see Uploading a file
For more information to book drawdown payments, see Booking uploaded payments.